Thursday, July 12, 2012

24 Hour dill pickles

So what do you get when you combine.....


H2O


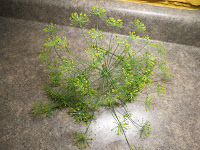
Dill from the garden

 Any guesses??  I'll give you a hint...they taste like a pickle :) 
The yummiest & easiest 24 hour dill pickle ever!!  No really....ever....

Now that you know what is all in it let me fill you in on the rest....This is an old family recipe & I own the rights so please do not sell them or I will find you...lol.  On we go....

3 to 4 pounds pickling cucumbers
BRINE:
4 Cups vinegar
12 Cups water
1/2 Cup salt
1/4 Cup sugar
dill (preferably fresh but seeds will work)


Here are the easy peasy directions....

You place the vinegar, water, salt & sugar into a large pot....bring to a full hard boil....that's it for the brine


While the brine is on the stove you will want to prep your pickles....oops I meant cucumbers :)  Just cut into 4 slices....


You then are just going to layer your cukes & dill in a couple of layers. 

Once your brine is done *carefully* pour the brine over the pickle/dill concotion....

That's it....you're done!!  The last thing I do though to keep anything from flying in my awesome pickles is I lay a heavy plate over the top of the bowl....stick in the corner & let sit for 48 hours....I know I said they are 24 hour dills but the flavor is really enhance by letting them sit a bit longer....

This is where they will stay until i'm ready to eat them....
NOTE: could be eaten in 24 hours but 48 is much better....

When they are done just fill mason jars evenly with pickles, dill and brine and put in the fridge.  They last pretty long.....

Tuesday, June 19, 2012

Salisbury Steak...slow cooker version

So who doesn't love salisbury steak?  A crazy person right:)  I was so used to the salisbury steak that you would buy in the "frozen" section...That was OK when I was a kid but now that i'm a big kid I want the real deal.  I came across this recipe for a slow cooker salisbury steak.....what? ... someone just said my favorite summer word!  SLOW COOKER... I was so there!  Here's how it's done...

You start with your basic ingredients that you may even have in your pantry....well except for the ground beef & the milk:)

2 pounds ground beef
1 (1ounce) packet dry onion soup
1/2 C Italian bread crumbs - fresh or dry...it's up to you
1/4 C milk
1/4 C All Purpose flour
2 Tablespoons vegetable oil
1 (10.75ounce) can Cream of Mushroom Soup
1 (10.75ounce) can Golden Mushroom Soup
1 (1ounce) packet McCormick dry Au Jus mix
3/4C beef broth


You will start by mixing the ground beef, dry onion soup, breadcrumbs & milk in a bowl.  Next you will need to make 8 patties but  to make this easier on myself I score the meat into 8 sections before making into patties.

 Then I will roll them into 8 balls just to assure that they are generally the same size


Now for the fun part!  The squishing


You could do it between 2 pieces of parchment paper but I found it just as easy to do it with my hands.  Once the patties are all made the next step will be to brown them quickly.  That's where the oil & flour come in.  Heat oil in large fry pan & lightly dip both sides of patties in flour. 


Once floured , quickly brown on both sides to achieve this awesome look....

When you get all 8 of your patties browned it's time to pyramid them in the slow cooker.
Aren't they pretty:)

Once all the "hard work" is done it's time to mix together the gravy that you will have when they are done.  Mix in a bowl the soups, dry au jus mix and beef broth.  Tada!!  Instant gravy!
How yummy does this look!!

You will cook them in slow cooker on low 4 to 5 hours or until the beef is done.  If you wanted you could add your favorite potatoes to the slow cooker 2 hours before expected end time.  I know opening the lid breaks the cardinal rule but trust me....with this it does not make a difference.

Here is the end result...

Wait for it...

OK...now (but please excuse my china)


Enjoy!


Sunday, May 20, 2012

Granny Smith rocks

So what do you get when you cross:
 1.Granny Smith Apples  2.Cool Whip & 3.Snickers bars ?   The easiest & tastiest summer picnic dish!  A Mom in my daisy troop brought this to the bridging ceremony....yummo!!
So here is the whole list you will need to get at the store!  I love recipes with not a lot of ingredients!

What you will need is just these 3 items....

(1) 3lb bag of granny smith apples
(1) small tub of Cool Whip
(3) regular sized snickers bars
....

that's it!!

In a large bowl cut up the apples into bite size pieces...


*** My little trick to keep the apples from sliding all over is I just slice a bit off the bottom so it sits flat ***

Next you're just going to cut up the snickers bars...the best part with this is if a few "pop off" the cutting board you get to eat them :)


Add this to the apples & give a little mix.  The last & final step is to add the Cool Whip.  This is how it will look when it is completely mixed in....


There's just something with the sour apple & the sweet cool whip & the yumminess of the snickers bars.  This will be a "big" hit at your next picnic or just something to munch on in summer!


Enjoy

Thursday, February 23, 2012

Slow Cooker refried beans

This has to be the easiest & tastiest version ever of refried beans.  I will no longer be buying them from the store! 

Ingredients:
 1 onion, peeled & halved
3 cups dried pinto beans, rinsed
2 Tablespoons minced garlic
5 teaspoons salt
1-3/4 teaspoon pepper
1/8 teaspoon ground cumin
9 cups water

Next you will combine all of the ingredients in a large slow cooker...

before water...


after water...


Set your slow cooker to High & slow cook for 8 hours.  After the 8 hours are up and your kitchen smells like a mexican restaurant strain the beans but reserve the liquid.

Now for the fun part.....mashing.  I suppose you could use a potato masher but I have an easier tip....

TA DA.....


I love my immersion blender!!  Could not live without it!!

End result are creamy refried beans....

You can eat them right out of the bowl with even tortilla chips....yummy!! 

*tip*  Make a big batch - freeze in 2 cup portions.....when you want some just thaw out & heat them in a little bit of olive oil.....in the words of Emerill.....BAM


Wednesday, February 22, 2012

Vanilla - Almond granola

1st let me start out by saying....yummy!  WAY better than store bought.....


Vanilla - Almond Granola
4 cups old-fashioned oats
1 cup slivered almonds
1/4 tsp salt
1/8 tsp cinnamon (or to taste)
1/3 cup vegetable oil
1/4 cup honey
2 Tablespoons sugar
4 tsp vanilla extract
1 tsp almond extract

The 1st thing you will do is to line a large baking sheet with foil.  This makes clean up soooo easy :) Then in a large bowl you will mix together the oats, almonds, brown sugar, salt & cinnamon. 


Then in a sauce pan combine the oil, honey & sugar....bring to a simmer over medium heat.  Stir until the sugar dissolves. Take off of the heat and stir in the Vanilla. 


Then pour the hot liquid over the oat mix - stir well - using your hands to toss once it's cool enough to touch. 


Then spread the granola on the foil lined baking sheet and bake @ 300 degrees for 30 to 40 minutes.  Stirring occasionally while baking.

Cool before storing....try not to eat it all when it's hot out of the oven.
I love to sprinkle this over vanilla yogurt.

Enjoy


Saturday, January 7, 2012

Red Velvet wedding cake.....

My brother Aaron got married yesterday & I wanted to do something nice for him and Jenni.....I heard they were not having a cake - so - I offered.....You can't have a wedding without a cake right?

Here is it......It took my 2 1/2 days but was well worth it!!!    I used Buddy Valastros (the cake boss) icing recipe....so nice to work with!


Monday, January 2, 2012

Homemade Vanilla Extract

For those of you who like to bake as well as cook......ooh ooh ooh....me!!  I do I do.....I came across a recipe for "do it yourself" Vanilla extract.   (which I use a ton of)  It could not be simpler....

Vodka & Vanilla beans.....pretty easy huh!  That's what I though. You just cut your vanilla beans in half ~ put them into a jar ~ add Vodka.....voila!!!   It will take a couple of months so make sure you put the date you did it on the bottom with a piece of tape (if I put in on a calendar I know I would lose the calendar!)       The only work you have to do is give it a good shake once a day!  It will start to turn brown in about a week. Just keep up the shaking & in 2 months you have vanilla extract! 


When the 2 months are up just simply remove the vanilla bean & strain really well through cheese cloth to remove all of the seeds.......Guaranteed to never run out!

This is after only 1 month of sitting.....
Only 1 month to go:)