Monday, December 5, 2011

Happy Birthday Brady....

  My son Brady was turning 8 & I asked him what kind of cake he would like for his birthday....he of course said Yoshi. So without avail I searched hi & low for a yoshi cake pan....even the cake specialty shop in town did not have one!  Now I knew I was in trouble.  Then all at once the idea popped into my head ~ I found a picture of yoshi on the internet, went to my local print shop with printed picture of yoshi & my huge honkin' cake pan in tote....I said with a pretty please & a smile if they could help me fit the yoshi into the cake pan as big as possible. The guy came over with his handy dandy wheel thing to size things & figured out how much the pic needed to be blown up.....ba da bing...ba da boom...I had a big yoshi:)   I was so thrilled I had to go show my husband right away.  I first had just planned to cut around the yoshi & use the extra cake for "1-up" mushrooms but as I laid the "laminated" yoshi on the cake I just did not think it would work like I planned. So instead I frosted the cake first....laid down the yoshi & with my niece Carissas idea on utilizing tooth picks....I traced around yoshi, peeled him off & got to decorating.
  Being a bit nervous seeing this was my "1st cake without just slapping frosting on it" got to work......here's how it turned out.....


So proud of myself & Brady loved it!

Saturday, December 3, 2011

Celery what??

That is what I hear the most this time of year from the produce people at my local grocery store when I ask them when they are getting their seasonal delivery of Celeriac......

You know.....the knobly root that tastes & smells very similar to celery.....except a bit bigger.
So the grocery store finally received it so I figured I better grab & get some frozen for winter soup use.

So basically I just cut in half - cut those halves into slices & just cut around to remove the skin.

After that is done I just cut into bite size pieces & get them ready for the blanching process.

They will get blanched for 4 minutes & immediately get put into an ice water bath to stop them from cooking & getting all mushy....
My rule of thumb is to let them in the ice bath as long as they were blanched...
After they are done I remove them using my awesome spider & dry them using paper towel...

Then I just pack them in a good quality freezer bag - label - date & freeze flat.

Very tasty in soups....you could also roast them in some olive oil - choice of spices in a 400 degree oven 25-30 min or until fork tender.....

Yummo!!!!


Wednesday, November 30, 2011

Mushroom cupcakes???

My son is turning 8 tomorrow....for school the kids always take cupcakes to share....I asked him what he would like for his cupcake "theme" & his response & I quote --- I want 1-up mushrooms from the Mario game.....cute right!

Normally I make my cupcakes from scratch but due to a "dead" refrigerator I just did not have the time so boxed cake would have to do. 

I noticed that it called for egg whites rather than eggs.....I read on the bottom of the box & all it said was that if you used whole eggs to bake 1 minute more....So as I was filling the liners I noticed it was runny...It never said to lessen the liquid if using whole eggs....guess I was just to crazy busy to realize.

I decided to bake them & just hope for the best. They were "OK" when I took them out....kind of flat but I figured that would happen.  I let them cool & when I walked back into the kitchen I noticed that I had a muffin tin full of inverted nipple cupcakes!!  OMG...  I could of just cried.  I almost chucked them and made more but I did not have the time! 

I frosted & decorated them.....this is the end result---
Cute but these are the
flatest mushrooms I ever saw:)

I guess that will learn me....

Monday, November 21, 2011

Homemade Ravioli cheese filling

Here is the recipe for a basic cheese filling for the ravioli I made.......


1 Cup Ricotta cheese
2 Tablespoon parmesan
2 eggs
1/2 teaspoon salt
1/2 teaspoon pepper

* Mix first 3 ingredients together until a paste is formed.....then add the S & P....

refrigerate for at least 1/2 hour

Homemade Ravioli

This was my 1st attempt at homemade ravioli & it turned out wayyyyy better than I ever would of expected!!  Almost one of those "to easy" recipes!!!  How could it taste so yummy! 

A very basic dough recipe that could be used for more that just ravioli.....


Ravioli Dough recipe
2 Cups flour - I just used all purpose
3 Eggs
pinch of salt


How easy is that!!

Just mix all together until well incorporated & knead for 10-15 minutes.  I separated that into 2 pieces - chilled in the refrigerator for 1 hour.  When I was getting ready to roll it out I then split the 2 balls of dough in half once again...more dough = more ravioli:)


It's hard to believe that a ball of dough could be transformed into this beautiful sheet of dough....I love my pasta maker:)
Then I floured my counter space & started to add the filling.....
I just made a cheese filling.  Once you get the filling in brush an egg wash on top of the ravioli dough & in between the filling. This will be the binder.  I just used 1 egg with 1 Tablespoon of water. Don't overdo the wash...a little egg goes a long way:)
I did the ravioli a couple of ways to see how I could get the most out of my dough.....I liked the "fold over" method the most ~ the above method was using 2 pieces of dough. For the fold over you would just put the filling a bit closer to the bottom & fold over....to easy!
Once sealed take your pizza cutter to cut raviolis to size & off with the ragged edges:)  Seal edges with a fork and this is what you get....
What a pretty ravioli!!
Just add some sauce & you're good to go!

Thursday, November 17, 2011

Ode to Paula Dean "beef stew"

It was a cold day in November here in Green Bay WI ..... I had other dinner plans planned but then I felt the need for some comfort food!!  What else says comfort food like beef stew!  So I went online to google a different recipe (because the one I usually do goes in the slow cooker and it was to late to put it in there) & up pops Paula Dean's "Old-Time Beef Stew" ~~ there was a quick video so I watched it & I was instantly hooked!!  I mean who doesn't love Paula Dean:)  It looked very easy & quick which is exactly what I was looking for. I did tweak it just a bit but not much....I will put her recipe down exactly as it was and in parentheses i'll put what I tweaked it with.  Here we go:

Old-Time Beef Stew
2 pounds stew beef  "I used chuck roast-cut it myself"
2 Tablespoons vegetable oil  "I used Olive Oil"
2 Cups water  "I used 2 C homemade chicken stock & 1/2 C dry red wine"
1 Tablespoon Worcestershire
1 clove garlic, peeled - just smash once with knife
1 or 2 bay leaves  "I used 2"
1 medium onion, sliced
1 teaspoon salt
1/2 teaspoon pepper
1/2 teaspoon paprika
Dash ground allspice or ground cloves  "I used ground cloves"
3 large carrots, peeled & sliced
**I added 4 large red potatoes, quartered**
3 ribs celery, chopped
 2 Tablespoons cornstarch


** Brown meat in hot oil.  Add water, worcestershire, garlic, bay leaves, onion, salt, sugar, paprika and allspice.  Cover & simmer 1 1/2 hours.  Remove bay leaves and garlic clove.  Add carrots, celery and other veggies.  Cover and simmer an additional 30 to 40 minutes or until the veggies are fork tender.  To thicken gravy, remove 2 cups hot liquid. Using a separate bowl, combine 1/4 water and cornstarch.  Mix that with hot liquid and return mixture to pot.  Stir & cook until it reaches thick consistency.  **I also added 2 Tablespoons of flour to help thicken**

"before veggies"


"after veggies"

I just grilled up some french bread with butter & voila.....comfort food to die for!!

Enjoy!!!


recipe courtesy of Paula Dean


Monday, November 14, 2011

No-knead Ciabatta bread

I'm always looking for different bread recipes that I can make so when I came upon the "no-knead" Ciabatta....I just had to try.  So easy!

Ingredients

4 C flour  (I used just regular all-purpose)
1/4 tsp yeast (the little packet ones)
1 1/2 tsp salt
2 C warm water

*** In a large bowl combine all ingredients well ~ cover bowl with foil & let sit out at room temperature for 18 hours ***   I know 18 hours seems like a long time but this is good to do on a Sunday afternoon & by mid Monday morning you are able to make bread

This is what it will look like after the resting period.....
Then what you will want to do is just fold it over onto itself about 4 to 6 times....just to wake up the gluten...

Now it's time to shape the dough...

Find a nice flat spot on your counter - spray with just a bit of water to deter the saran wrap to slip when shaping the dough.  Sprinkle saran wrap with flour so the dough does not stick as it will be sticky...put dough onto saran wrap & shape into the shape like a long oval....it does help if you also flour your hands.  Pulling the dough really speeds up the process...


Once the dough is form transfer it to a large oiled sheet pan *** all I did was just flip it over *** If the dough loses shape just go ahead and reshape it.  Now cover the dough with a clean cloth & let it rest for 2 hours at room temperature.  Don't be alarmed if the dough does not rise....it should only be spreading.

After the 2 hours place baking sheet in a 425 degree preheated oven for 35 minutes.....
~resist the urge to peek~

Voila~~~~Ciabatta bread

enjoy


recipe courtesy of foodwishes.com

Friday, October 28, 2011

Pumpkin cookies

I bought 2 more pie pumpkins from the Farmers Market so I have a lot of pumpkin puree to use up!  Who doesn't like cookies:)  So good & so easy!

Pumpkin Cookies
1/2 C unsalted butter, room temperature
1/2 C white sugar
1/2 C light brown sugar, firmly packed
1/4 C molasses   ~ I didn't have & they still came out awesome!
1 egg
1 C pumpkin puree ~ homemade or canned
2 C all-purpose flour
1 tsp baking soda
1 1/2 tsp cinnamon
1/2  tsp nutmeg
1/2 C milk *can use buttermilk*
sifted confectioners sugar, for dusting

In a large mixing bowl, cream butter & sugars until light and fluffy.  Beat in molasses and egg.  Stir in the pumpkin puree.  In another bowl, sift together the flour, baking soda, cinnamon and nutmeg.  Stir flour mixture into the creamed mixture along with the milk.  Blend thoroughly but do not over beat.  Drop cookie dough by rounded teaspoonfuls onto greased baking sheet.

Bake at 375 for about 12 minutes, until set. Cool for a minute - remove to racks and continue to cool.  Dust cookies with confectioners sugar.  This will make about 3 dozen cookies.

Cream of Celery Soup

This is one of my favorite "cream" soups to cook with!!  It adds so much flavor to chicken:)  You can change it up as well and just add a different "main ingredient"....such as mushrooms for Cream of Mushroom Soup....cooked chicken - asparagus....I think you get the picture.  Very easy soup to make!

 
       Ingredients:
2 cloves garlic, minced
1/2 C small onion, diced
1/2 C main ingredient, diced
1/4 C unsalted butter
1/4 C flour
1 C milk
3/4 C broth or stock ~ I used veggie broth

**If you would happen to make Cream of Chicken you could just use chicken stock ~ mushroom soup maybe veggie stock**

 Directions:
Saute garlic, onion and main ingredient and set aside. Melt butter over medium heat.
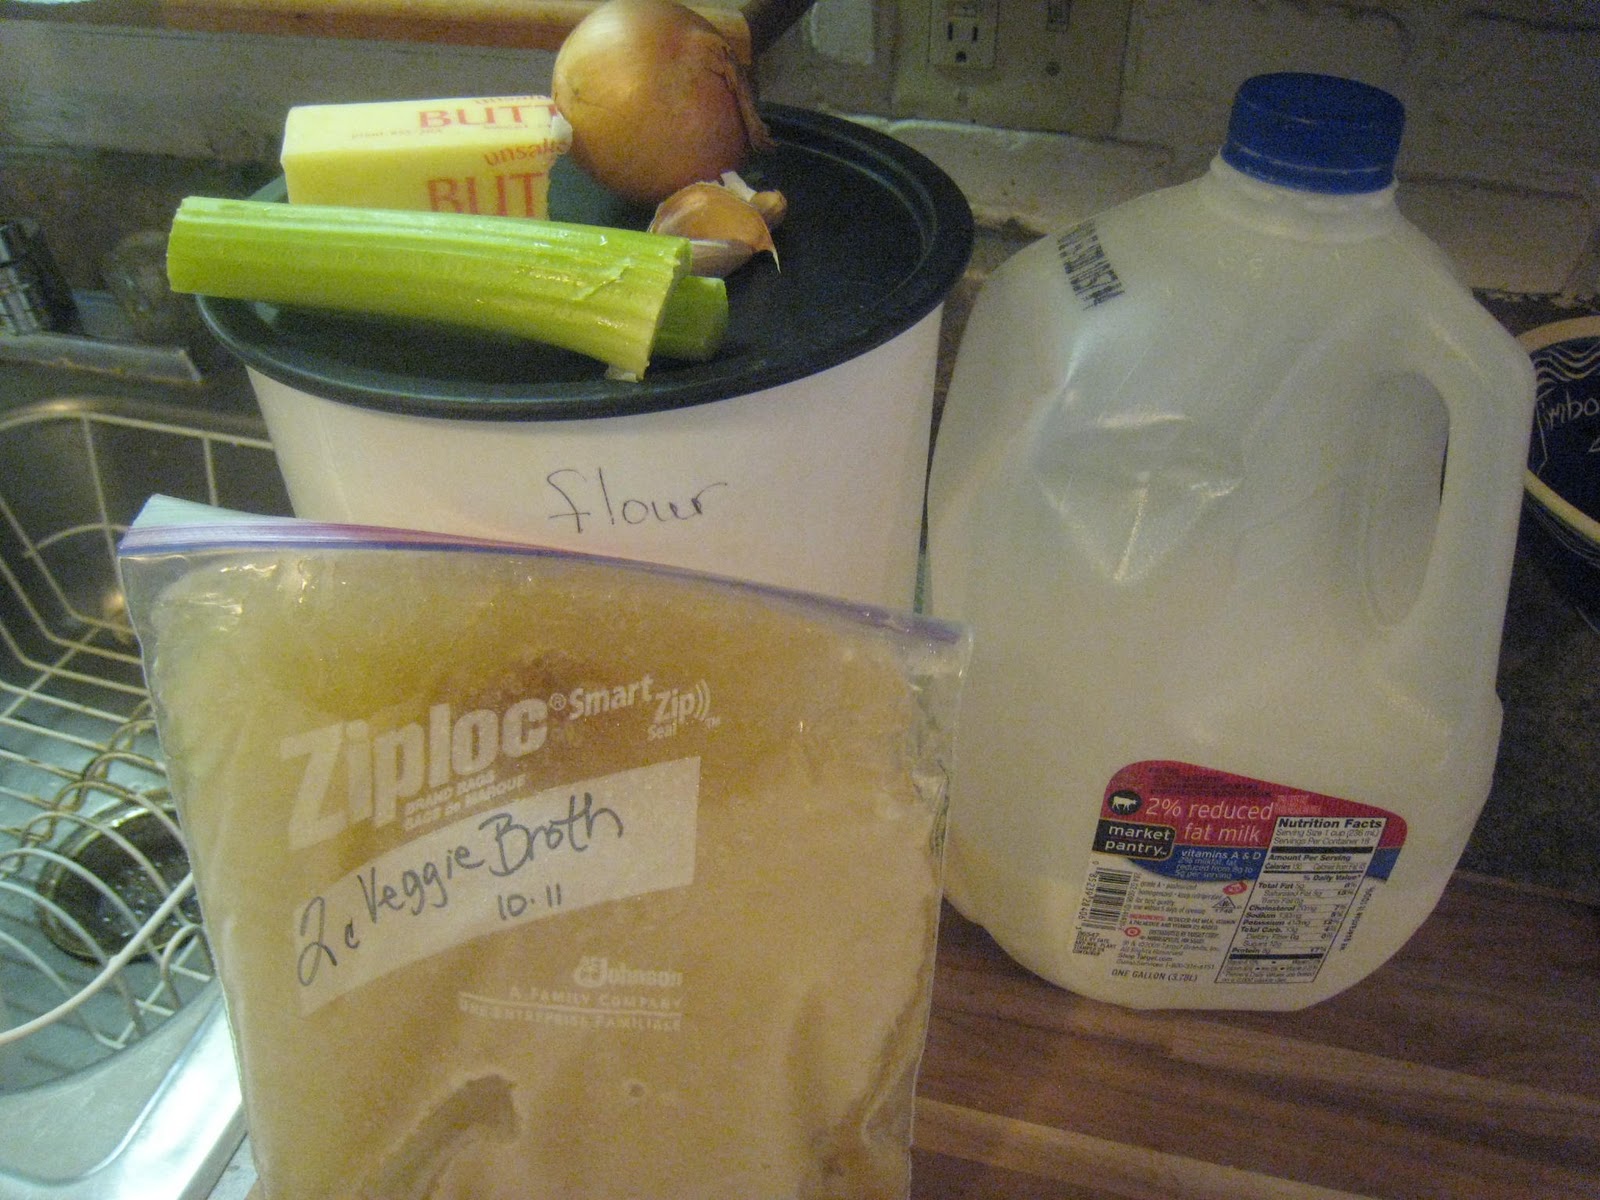
Whisk in flour and cook for an additional 2 minutes.  Add milk & broth. Add sauteed garlic, onion and main ingredient. Bring to a boil, reduce to a simmer *stirring regularly* until it reaches desired consistency (about 10-15 minutes).  Season to taste with salt & pepper. Use as you would use a condensed soup from the grocery store.  This can be refrigerated up to 4 days or freeze.

If you freeze, freeze in batches in either pint or quart sized freezer bags. You can also add the soup to your recipe and freeze the whole recipe.

Saturday, October 15, 2011

Pecan Sandies shortbread stackers

My husbands family was having their family reunion tonight & I signed up for desserts:)   I made 3 different kinds including the Pecan Sandies shortbread stackers.....Soooooo easy seeing that the cookies were waiting for me on the shelf at the store:)

Pecan Sandies shortbread stackers
2 packages Pecan Sandies cookies
1C Whipping Creme
1/2 tsp Almond Extract
"about" 1/2 C Powdered Sugar
brown sugar

1. Place whipping creme in chilled deep bowl & beat on HIGH until creme reaches stiff consistency
2. add almond extract & powdered sugar **you can add more if wanted more sweet**
3. take 2 cookies & put 1Tbsp of creme on one of the cookies & top with 2nd cookie
4. add a drop or pipe some creme on top & sprinkle with brown sugar

Keep refrigerated until ready to eat.....that's it!!   The brown sugar on top was amazing!


Tuesday, October 11, 2011

Homemade Italian Bread Crumbs

Preheat oven to 250 ~ lay 6 slices of bread on cookie sheet ~ cook for 20 - 25 minutes or until the pieces are completely crisp & not bendy at all

Using a food processor - process bread up into crumbs....
2C bread crumbs
1/4 C parmesan cheese, grated
2 T dried parsley
1 tsp dried oregano
1 tsp dried basil
1 tsp garlic powder ~ combine & store in an airtight container in the refrigerator for up to 2 months

** I use these bread crumbs in so many recipes it's hard to keep track~so versatile**

Monday, October 10, 2011

Meatball Sami's

This is one of those meals that will instantly make your dinner table "quiet"!!  As soon as the family sinks their teeth into these yummy meatball sami's....it's all down hill from there! 

Meatball Sami's

Sauce:

1 large can crushed tomatoes
2 jars Classico Spaghetti Sauce (your choice)
1 tsp chopped garlic
**only thing not shown is tomatoes due to the fact that they were out of my freezer & this is a "after" picture**

Puree tomatoes - then add everything else EXCEPT for the meatballs into pot - simmer 20 minutes *or* heat on low in slow cooker for 1 hour - Add meatballs & simmer another 10 minutes

Meatballs:

1 lb ground beef
1/2 C Italian bread crumbs ~~recipe to follow to make your own
1/3 C water ( more or less )
1/4 C Parmesan
1/4 C finely chopped green pepper
1 medium onion - fine chopped
1 clove garlic
S & P
~Mix all together making sure not to add all of the water at once....just gradually ~ form into meatballs & bake at 4oo for 16-18 minutes or until done

So instead of putting the whole meatball on the Bolillo roll I cut each one into small slices....covered with sauce & provolone cheese....

These were so good!!  The kids loved them!!

As promised....homemade Italian bread crumb recipe:

Preheat oven to 250 ~ layer 6 slices of bread on cookie sheet ~ cook for 20 - 25 minutes or until the pieces are completely crisp & not bendy at all

Using a food processor - process bread up into crumbs....
2C bread crumbs
1/4 C parmesan cheese, grated
2 T dried parsley
1 tsp dried oregano
1 tsp dried basil
1 tsp garlic powder   ~ combine & store in an airtight container in the refrigerator for up to 2 months

Sunday, October 9, 2011

Call me silly ...

Ok ... call me silly ... Omelets scare me!!  I could never make one....well that all changed today!!  I was so hungry for a Omelet that I decided to try my hand at it again!!  So I cracked 4 eggs & whisked with some milk - sprayed my pan.... I like veggies in my Omelet so I diced up some green peppers, tomatoes still from the garden & some mushrooms from last night....Omelet from HEAVEN!! As the sides cooked I slowly & carefully pushed  back to put the egg underneath....you know...the way a Omelet is supposed to be made :)  (did I mention that I am scared of Omelets!)  I got it to the point that I thought I could flip it with my spatula - flipped it - cooked a little bit on the other side & ..... wait for it....flipped it in the pan! WOW....that was so cool!  Added my veggies & cheese and VOILA......

  My 1st Omelet:)

So proud...

Thursday, October 6, 2011

Pumpkin Pie

Fall also means Pumpkin Pie!!  One of my favs!!  When I say pumpkin pie I don't mean the stuff that comes from a can either.....not in this house!  I had a pie pumpkin come up from seed this year!  Wahoo!!
Nothing quite like the smell of pumpkin cooking in your house!
If you happen to have a pie pumpking here is what you to do get all the yummy stuff out of the middle to make an incredible pie....

**Preheat oven to 350 - cut pumpkin in half & remove stem & seeds - place skin side up on a cookie sheet - add about an inch of water to pan - cover with foil - bake for 45 minutes or until a fork pierces skin easily - allow to cool - scrape pumpkin out of shell - using an immersion blender (this works the best) - puree pumpkin - use fresh or freeze **I freeze in 2 cup incriments seeing this is how much my recipe calls for**
Now onto the pie!
Pumpkin Pie Filling
1 (14oz) Condensed Milk
2 large eggs
1 tsp Cinnamon
1/2 tsp Ginger
1/2 tsp Nutmeg
1/2 tsp Salt
2 C fresh pumpkin puree
** Preheat oven to 425 - whisk pumpkin, condensed milk, eggs, spices & salt until smooth. Pour into unbaked crust (recipe to follow) - - bake 15 minutes - - reduce temp to 350 - - (this is when I put on the foil protection onto the crust to prevent burning) - -  bake 35 to 40 minutes longer or until knife comes out clean

I know I did this backwards but now onto the crust!
Homemade Pie Crust
2 C unbleached flour - sifted
1 tsp salt
2/3 C butter shortening
5-7 Tbsp ice water


Sift flour into a mixing bowl with shortening - using a pastry cutter, cut shortening into flour - add salt & water ( I always start at 5 Tbsp ) - mix dough until formed - roll out on floured surface with floured rolling pin * when done transfer to 9" pie plate - gently pushing crust into pie plate - trim crust off as necessary - tuck ends of crust down & crimp
Here is the end result.....
Sorry for the indent in the middle :) I had to make sure it was done:)
Yummo!!

Monday, October 3, 2011

Old Fashioned Apple Cider

It's Autumn and nothing says Autumn like apple cider....  I found this recipe for a delicious old fashioned apple cider.... Very easy to do & the house will smell amazing!!

12 or so small/medium apples ~ I used 6 Gala & 6 Cortlands
1 small Orange
1/2 C - 1C brown sugar
3-4 Cinnamon sticks
1 whole nutmeg
1T whole cloves
water to cover

**Wash & roughly chop apples & orange ( no need to peel, seed or stem)
Toss into a large stock pot (use a big one -- you get more cider that way)
Add sugar (I started with 1/2C)
Add spices & cover with water


Bring to a boil & boil uncovered 1 hour ~ then reduce the heat, cover & simmer for 2 hours *do not stir while simmering*

When done uncover & using a potato masher roughly mash the contents
*To further reduce you can leave simmering until cider is dark & tastes sweet & spicy

When cider is cooled completely strain apples & spices into a clear pitcher or pot *you could also strain further by putting apples into a piece of cheesecloth & just squeeze out juice*

Serve hot for the best apple cider ever!


Homemade Chicken Stock

So now that I have just about depleted my chicken stock from last year it's time to make some more:) 
Which is just about one of my favorite things to do!!  It makes the hou 0 cse smell so amazing!! So when life hands you an emply chicken carcass from a rotissierie chicken....you make chicken stock!

I've tried it with baking my chicken pieces first & then making the stock but the carcass makes such a more flavorful stock!! 

Chicken Stock:
1 chicken carcass or 2-3 assorted chicken pieces
1-2 medium onion - quartered "not need to peel seeing that you will be running stock thru a sieve)**this time I used a white & red onion
2 carrots - peeled & cut into chunks
3-4 stalks celery w/ leaves-cut in half
**now this is where you can be inventive on what you add to your stock--I also add 1-2 parsnips-peeled & cut in half
I made mushroom soup & I saved the stems to go into the stock
I had a daikon radish left so that also went in-no need to peel this
I also added 3 leeks with the stem cut off

The herbs that will go into this is:
1-2 sprigs fresh thyme
1-2 sprigs fresh rosemary
1-2 sprigs fresh sage
fresh parsley sprigs
2 bay leaves

so throw all of the above into a large stock pot~fill pot with water to top & then add:
1 tsp garlic powder
1 tsp pepper
1 tsp kosher salt
2 chicken bouillion cubes....stir all together well

Bring to a boil - reduce heat & simmer covered (very few bubbles coming to surface) for at least 2 hours & up to 4 hours (you can let it go longer if you wish)
Skimming off foam as needed

Once stock is done~let cool for a bit~strain stock through a small holed colander~discard carcass & veggies....
Return stock to oven and add:
2 chicken bouillion cubes
dried parsley to taste
salt & pepper
dried thyme to taste
chicken base to taste

VOILA!!  Beautiful chicken stock

You can either transform this into chicken soup or just freeze it and use it when needed :)
Depending on the size of stock pot you use you will get about 20 cups of stock. I freeze some in 2 cup incriments & also 4 cup (which is the size of the stock you can get in the store)

Enjoy!